ProtoInteractor: A Simple Business Object for Hanami

No dogma, just what I'm learning and thinking about right now.
Comments and feedback are welcome on Mastodon.
"If you're thinking without writing, then you just think you're thinking."
—Leslie Lamport
This isn’t an article about fantastic feats of programming prowess, but more of a cobbler’s tale about piecing together a useful object from existing libraries. I’ve been working with Hanami–and loving it! :)–and I wanted a “procedural” business logic object around which to organize my code.
This sort of object is pretty common and goes by many names. It’s sometimes called an interactor, an operation, a command, or (most confusingly) a service object. Hanami 1 had an interactor object, so I decided to call mine ProtoInteractor. This is both homage to Hanami 1, and to indicate that this project is meant as a prototype and may not be ready for production use. That is to say, the name may very well change. ;)
With the important naming part out of the way, let’s start building!
Requirements
My overall goal is to separate my “business logic” from the “infrastructure” of my application. This includes Hanami itself. In a sense, I want to create a boundary around my business logic. All business logic will be isolated within this boundary, and I will control everything that crosses it in either direction.
First, I want to parse all data that enters from outside the boundary. Within the boundary, I want a pattern for carrying out the procedural steps of my business logic, with the ability to short-circuit the process if any step should fail. Finally, when the steps are complete (or fail), I want to return a rich “data transfer object” that indicates success or failure, and contains data in the success case (if appropriate), and error messages in the case of failure.
How to create such an object? We could certainly do it from scratch, or we could build it from existing parts. Let’s look at our requirements from the perspective of existing projects. We want:
- The
paramsfunctionality of Hanami Actions to parse (including validation) all incoming data. - Do notation from Dry-Monads to allow us to compose business logic in successive, dependent steps.
- Result objects, also from Dry-Monads, to provide Success and Failure return objects.
Great! It looks like all of the pieces are in place. Let’s see how we can put them together.
params à la Hanami Actions
In Hanami Actions, the params method (that’s all it is) serves a number of functions, not just validation.
- First, it’s an allow/block filter. If a schema is provided to
params, then only the listed parameters will be available as validated parameters within the action. - Next,
paramsperforms coercion, if possible, by converting the provided parameters to the object types specified in the schema. - Finally,
paramsvalidates incoming data, returning a list of errors for all of the values that do not validate, either due to their absence or the inability to coerce them safely into accepted value types.
Yes, we want all of that!
It would be nice if we could just inherit from Hanami::Action and get all of this stuff for free, but that won’t do. In Hanami, Actions serve as the topmost layer of Rack middleware, and must conform to the prescribed Rack middleware interface. Since Rack is concerned with HTTP requests and responses, Hanami Actions are designed around this purpose. That’s way too much overhead to deal with in our little interactor–and not a very good use of inheritance in any case.
Okay, what if params was just a module that we could mix into our project? It turns out that it is. Sort of. Under the hood, the basic validation functionality in Hanami Actions is provided by another Hanami gem, Hanami-Validations. However, Hanami-Validations itself is just a thin wrapper around a dry-rb gem, Dry-Validation. Rather than rely on an intermediary dependency, why don’t we use Dry-Validation directly, and duplicate the functionality provided by Hanami::Action and Hanami-Validations in our code? I don’t have much experience writing gems or reading library code, so this seemed like a good project to me.
How params are used in Hanami Actions
Let’s start by looking at how the params method is implemented in Hanami Actions. Take a look at the code sample below, taken from the Hanami Guides. Note the DSL-ish use of params (with a code block) right in the class definition. This is actually just a method call of the class method Bookshelf::Actions::Books::Index.params. As with any other method, the do-end code block following params is passed to it as an argument.
# app/actions/books/index.rb

module Bookshelf
  module Actions
    module Books
      class Index < Bookshelf::Action
        params do
          optional(:page).value(:integer, gteq?: 1)
          optional(:per_page).value(:integer, gteq?: 1, lteq?: 100)
        end

        def handle(request, response)
          halt 422 unless request.params.valid?

          # At this point, we know the params are valid
          request.params[:page]
          request.params[:per_page]
        end
      end
    end
  end
end
Where does the params method come from? it’s defined in Hanami::Action, which is the parent class of Bookshelf::Action. When exactly is this method invoked? Since it’s an immediate method call (not a method definition), it’s invoked as soon as the Ruby interpreter encounters it. In this case, it’s when this file is passed to the Ruby interpreter and the interpreter reads the Index action class definition shown above. I’m not exactly sure when this happens in a code library like Hanami with many Ruby files, but I believe it occurs when this file is actually required by another file.
So what happens next? The params method sets a new constant, Params, within the in-memory Index class definition, and assigns a new class, Params (that is, Hanami::Action::Params), to this constant. Next, the method calls a params class method on the newly created Params class and passes it the block originally defined in the Index action. Are you following all of this?
This second params method then uses the passed-in block to create a Dry-Validations contract, and stores that contract as an instance variable of the new class–not an instance variable of an instance of the class, but of the class itself. I had to go to my Well-Grounded Rubyist to make sure I understood that one (page 143 of the 2nd edition, if you’re wondering).
And what happens next? . . . Nothing. Nothing else happens until Index is instantiated and invoked through its #call method. At that point, the call method will unwrap the request parameters from the Rack env object, instantiate the internal Params class, and pass the request parameters to that class for filtering, coercion, and validation.
This instance of Params is then passed to the #handle method of Index as the params attribute of the request argument (that is, request.params). request.params makes its contents available through various accessor methods, responds true or false to the #valid? method to indicate whether validation was successful, and provides access to a list of errors if validation was not successful.
Okay, that was a lot. But there’s one more wrinkle that I’d like to cover before we look at duplicating this behavior in our interactor. That’s how Hanami Actions handle request parameters when no params block is provided. The answer is: they don’t. Hanami Actions must be permissive in this regard because parameter processing is an optional feature that might not be necessary or desired in all cases. Therefore, when no params block is provided, Hanami Actions simply extract the request parameters from env and wrap them in an instance of a class, Hanami::Action::BaseParams, that essentially treats the parameters as a hash with various convenient accessor methods. In addition, all instances of BaseParams always identify themselves as “valid,” as if they had passed validations.
Adding params management to ProtoInteractor
Before we begin, let’s discuss our intended design briefly. Our interactor will function in much the same way as an Hanami Action. We expect them to be instantiated and then called with two arguments: a user (required) and a raw parameter object (optional, must be either a hash or something that’s hash-able via #to_h).
The user required argument is peculiar to the way I want to use interactors in Hanami: all interactors will know what user is invoking them, even if that means a “system” user or a not-authenticated/null-object user. In practice, the interactor’s call method will parse the raw parameters, and then call a handle method. The handle method will expect to receive user and the parsed parameters as its method arguments.
Our interactor, however, will differ from Hanami Actions in the way in which it handles the absence of a params block. Unlike Hanami Actions, interactors should handle the absence of a params schema as an indication that no parameters will be available within the interactor. Therefore, we will implement a BaseParams class just as Hanami Actions do, except ours will always appear like an empty hash, and it will always answer #valid? with false.
Let’s get started! Reminder: I can’t take much credit for the following code, as most of it is taken from the Hanami gems with minimal changes. Here is the basic skeleton of our interactor (with boring code not shown).
module ProtoInteractor
  class Interactor
    # other not-interesting stuff . . .

    PARAMS_CLASS_NAME = "Params"

    def self.params_class
      @params_class ||= BaseParams
    end

    def self.params(klass = nil, &blk)
      if klass.nil?
        klass = const_set(PARAMS_CLASS_NAME, Class.new(Params))
        klass.class_eval { params(&blk) }
      end

      @params_class = klass
    end

    def call(user, params = {})
      parsed_params = self.class.params_class.new(params.to_h)

      handle(user, parsed_params)
    end

    protected

    def handle(user, params)
    end
  end
end
These four methods provide the basic params functionality for our interactor. Let’s walk through the code.
PARAMS_CLASS_NAMEis a constant that defines the name we intend to assign to the parameter-validating object created in theself.paramsclass method (see below). It’s defined as a string here, but will be coerced into a symbol by theconst_setmethod. We define this name explicitly to avoid using a hard-coded value inself.params.self.params_classis an attribute reader for the class instance variable@params_class. If@params_classis not set, this method sets its value to the constantBaseParamsand returns that. In practice, this means thatBaseParamswill be used only if noparamsblock is provided in the interactor’s class definition.self.paramsis the class method called called byparamsblocks in our interactor objects. You can see that it takes an optional argument,klass. This is consistent with Hanami Actions, and allows users to pass in a concrete class to parse parameters (this would be an advanced usage pattern using a concrete class that inherits fromProtoInteractor::Interactor::Params). Ifklassis nil, then this method creates a new, anonymous class that inherits fromProtoInteractor::Interactor::Params, and assigns it to the constantParams(as defined inPARAMS_CLASS_NAME). The method then passes the block argument to theparamsclass method of this new class usingclass_eval. Finally, the new class is assigned to the@params_classclass instance variable. It is now configured to do its work when called upon.callis the instance method used to invoke the interactor. It takes the argumentsuser(required) andparams(optional, defaults to an empty hash). This method convertsparamsto a hash, then passes this hash to the initializer of theParamsclass created byself.params, and assigns the resulting new object to the variableparsed_params. Finally,callinvokeshandle, passing ituser(unchanged) andparsed_params.handlehas no operation here, but serves to establish the method signature to be implemented by developers when creating an interactor.
Let’s look at BaseParams next.
module ProtoInteractor
  class Interactor
    class BaseParams
      attr_reader :raw

      def initialize(disregarded_params = {})
        @raw = disregarded_params
        @params = {}
        freeze
      end

      def [](key)
        @params[key]
      end

      def each(&blk)
        to_h.each(&blk)
      end

      def get(*keys)
        @params.dig(*keys)
      end
      alias_method :dig, :get

      def to_h
        @params
      end
      alias_method :to_hash, :to_h

      def valid?
        false
      end
    end
  end
end
Remember that BaseParams is the class used when no params block is provided to an interactor. The rule is that no parameters will be passed through, and the params object will always answer #valid? with false. Here’s how it works.
attr_reader :rawsets up an attribute reader for the instance variable@raw. This attribute will be set ininitialize.initializeaccepts a parameter object (recall that it will be a hash) and assigns it to the instance variable@raw. This means that the “raw” parameters sent to the interactor will always be available within the interactor. This method then explicitly sets the@paramsinstance variable to an empty hash, ensuring that the this object will always appear to be “empty.”[],get, anddigare accessor methods used to retrieve values from@params.eachexposes an enumerator for@params, makingBaseParamsinstances compatible with Ruby’s Enumerable module.to_handto_hashare converters to return@paramsas a simple hash object.valid?always returnsfalse, as advertised. This is to remind the user that the parameters have not been parsed.
That wasn’t too bad, right? It may seem weird that we’re defining an enumerator and accessor methods for an object that by definition will always be empty, but it makes more sense if you think of BaseParams as both the base class for and the null object implementation of all params objects. As such, it must quack like any other params object, even if it happens to be “empty.”
Now, let’s look at how it works when our interactor does contain a params block. This is our Params class, with some code for processing errors and error messages removed.
module ProtoInteractor
  class Interactor
    class Params < BaseParams
      class Errors < SimpleDelegator
        # process errors into a nested hash
      end

      def self.params(&blk)
        validations(&blk || -> {})
      end

      def self.validations(&blk)
        @_validator = Dry::Validation::Contract.build { schema(&blk) }
      end

      def self._validator
        @_validator
      end

      attr_reader :errors

      def initialize(raw_params)
        @raw = raw_params
        validation = validate
        @params = validation.to_h
        @errors = Errors.new(validation.errors.to_h)
        freeze
      end

      def error_messages(error_set = errors)
        # process @errors into an array of readable strings
      end

      def validate
        self.class._validator.call(@raw)
      end

      def valid?
        @errors.empty?
      end
    end
  end
end
Let’s jump right in! Note that this class inherits from BaseParams, so all of the instance methods defined there (accessors, enumerator, etc.) are available and functional here, unless overridden (e.g., #valid?).
self.paramsis the class method invoked by our interactor’sparamsclass method. It accepts a block argument, and then passes that argument to thevalidationsclass method below. If no block is provided, then it passes an empty Proc instead.self.validationsconstructs a Dry-ValidationContractusing the block passed in as the schema and assigns this contract to the class instance variable@_validator. Thus the far-traveling block that was originally passed to theparamsclass method of our interactor is finally evaluated.self._validatoris an attribute reader for the class instance variable@_validator, set to the validation contract in the previous method.attr_reader :errorssets up an attribute reader for the instance variable@errors, which is set ininitialize.initializeaccepts the raw parameters from the interactor and assigns them to the instance variable@raw(they are available within the interactor via the#rawattribute reader). It then invokes thevalidateinstance method to parse the raw parameters based on the contract created above. The validated parameters, if any, are assigned to the instance variable@params, and any errors are assigned to the instance variable@errors.validatetraverses its own class definition to access the@_validatorclass instance variable set inself.validationsabove, and call the contract contained there with@raw, the raw parameters set ininitialize. The object it returns contains both the parsed parameters, if any, and a collection of any errors encountered in parsing the parameters.valid?returnstrueif there are no errors, andfalseif there are any.
And that’s it! These three classes, Interactor, BaseParams, and Params provide us with all of the magic of Hanami Action params in our own interactor. Nice. Very nice.
Let’s look at Do notation next.
Implementing Dry-Monads Do notation
The Dry-Monads’ Do notation will go hand-in-hand with our use of Dry-Monads Result objects as the return values of our interactors. Result objects are straightforward. They provide two constructors: Success and Failure. If an operation is successful, it should return Success(<output-of-successful-operation>). If it fails, it should return a Failure(<error-symbol-or-message-or-whatever>). You can read more about Result objects in the Dry-Monads docs.
Result objects provide a number of methods to interrogate them and safely access the values wrapped inside. We can also use Ruby pattern matching to evaluate the Result objects returned from our interactors. That is very cool. Result objects are so useful that we’re going to use them not only as return values, but to wrap each step of the work done in our interactors. This will allow us to “short circuit” and exit the interactor if any individual step fails. This is where Do notation comes in.
How Do notation works
Do notation is a mixin from Dry-Monads. You can read the Do notation docs here. When included in a class, the Do notation module works by prepending the class with a module that passes a block to one or more designated instance methods in the class. This block is what does all of the work, as we will see. To decorate the call method with such a block, you would use:
include Dry::Monads::Do.for(:call)
To decorate call and handle, you would use:
include Dry::Monads::Do.for(:call, :handle)
To decorate all methods added in your class, you can also use:
include Dry::Monads::Do::All
Let’s look at how it works. Since the magic happens inside of the block provided by the Do mixin, we invoke it with the yield Ruby keyword, like this:
yield some-expression-or-method-call-or-variable
The block provided by the Do mixin will evaluate the expression on the right. It expects this expression to return a Result object. If the returned object is a Success, it “unwraps” the successful output value contained inside and returns that value. This can be used in variable assignments like so:
successful_output = yield some-expression-or-method-call-or-variable
If the expression on the right returns a Failure object, the yield block will stop execution of its enclosing method and cause the method to return that Failure object. This is the “short-circuit.” No further lines in the enclosing method will be executed, even if they use yield.
I will provide an example of a multi-step operations using Do notation later in the article. Some of the critical takeaways about Do notation are:
yieldexpects to receive a Result object, so all steps that useyieldmust return a Result object from the expression passed toyield.yieldalways provides either unwrapping or short-circuiting, therefore it should never be used on the last line of a method. Since the last line will provide the return value for the method, this line should return an actual Result object without tampering byyield.- Steps in the operation that are inconsequential to the overall operation, like logging, don’t require
yield.
Adding Do notation to our interactor
Including Do notation in a library class like our interactor is a little tricky. This is because the mechanism the Do mixin uses to decorate methods runs at the time the module is included. Therefore, if we include the Do mixin in our library class, it actually decorates the method in our library class. When this method gets overridden by child classes in user-land, the magic is lost! We could address this problem by mixing in Do::All, but I want to limit “magical” things as much as possible. Therefore, I would like a way to decorate only the #handle method in our interactor.
My strategy is to have users create a base interactor class in their projects. This base class will contain a flag of some sort. Then, in our library Interactor class, we will look for the flag in the inheritance chain, and only include the Do module in the correct class. That is, we will aim for immediate child classes of the class containing the flag. Let’s see how that might work.
Let’s create a base class in a sample Hanami project. It could look like this:
# app/interactor.rb

# auto_register: false
# frozen_string_literal: true

require "proto_interactor/interactor"

module Bookshelf
  class Interactor < ProtoInteractor::Interactor

    BASE_CLASS = true

  end
end
Now, in our library Interactor class, we will use the inherited hook to detect when child classes are defined and decide whether to include the Do mixin. The method implementation looks like this:
module ProtoInteractor
  class Interactor
    # Other not relevant code

    def self.inherited(subclass)
      super

      superklass = subclass.superclass

      if superklass.const_defined?(:BASE_CLASS, false) && superklass.const_get(:BASE_CLASS, false) == true
        subclass.class_eval { include Dry::Monads::Do.for(:handle) }
      end
    end

    # More not relevant code
  end
end
First, we must call super in any inherited method, like good little Rubyists. Next, we store a reference to the parent of the class currently being defined as superklass. Finally, we look for our BASE_CLASS flag in the parent class and make sure it’s set to true. If so, then we include Do.for(:handle) using class_eval in the current class.
And that’s it! We have Do notation in our interactor! One word of caution for this arrangement: if for some reason you implement a hierarchy of base classes in your project, you should only include the BASE_CLASS flag in the lowest rank of the base classes that will be the direct parent of the concrete classes in the app. Defining this flag at more than one level will result in warnings from Ruby (for re-defining constants), and only defining it at a higher level will not work.
Using Dry-Monads Result Objects
Finally! We’re in the home stretch! All that’s left is to add Dry-Monad Result objects for use in our interactor. Let’s see, the docs say that we have to include the module like this:
module ProtoInteractor
  class Interactor
    include Dry::Monads[:result]

    # All the other code we wrote
  end
end
And then . . . nothing. We’re done. Our interactor is done! :-D
Woo-Hoo! Let’s see how to use it!
Using ProtoInteractor
Let’s say that I have an Hanami AddressBook app. I might have a route like
get "/contacts/:uuid", to: "contacts.show"
that maps to the following action.
# frozen_string_literal: true

module AddressBook
  module Actions
    module Contacts
      class Show < AddressBook::Action
        include Deps[contact_repo: "repositories.contact"]

        params { required(:uuid).value(:string, :uuid_v4?) }

        def handle(request, response)
          parameters = request.params

          halt :unprocessable_entity unless parameters.valid?

          contact = contact_repo.with_addresses_by_uuid(parameters[:uuid])

          halt :not_found if contact.nil?

          response.render(view, contact: contact)
        end
      end
    end
  end
end
Now, this is a very simple query action, so refactoring may seem like overkill. Nevertheless, our goal is to explore a different pattern that separates “infrastructure” concerns, like requests and responses, from our business logic. So let’s see how that might look.
To start, we will create an interactor base class. Ours will look like this:
# app/interactor.rb

# auto_register: false
# frozen_string_literal: true

require "proto_interactor/interactor"

module AddressBook
  class Interactor < ProtoInteractor::Interactor

    BASE_CLASS = true

    private

    def validate(params)
      if params.valid?
        Success(params.to_h)
      else
        Failure[:invalid_data, params.errors, params.error_messages]
      end
    end
  end
end
As you can see, we placed our BASE_CLASS flag in this file, as all other interactors in this app will inherit directly from this class. In addition, we have defined a private validate method, since this function will be required in most interactors. This provides a good illustration of how Success and Failure objects are created. Notice the shorthand square-bracket syntax used to create the Failure object with an array of values.
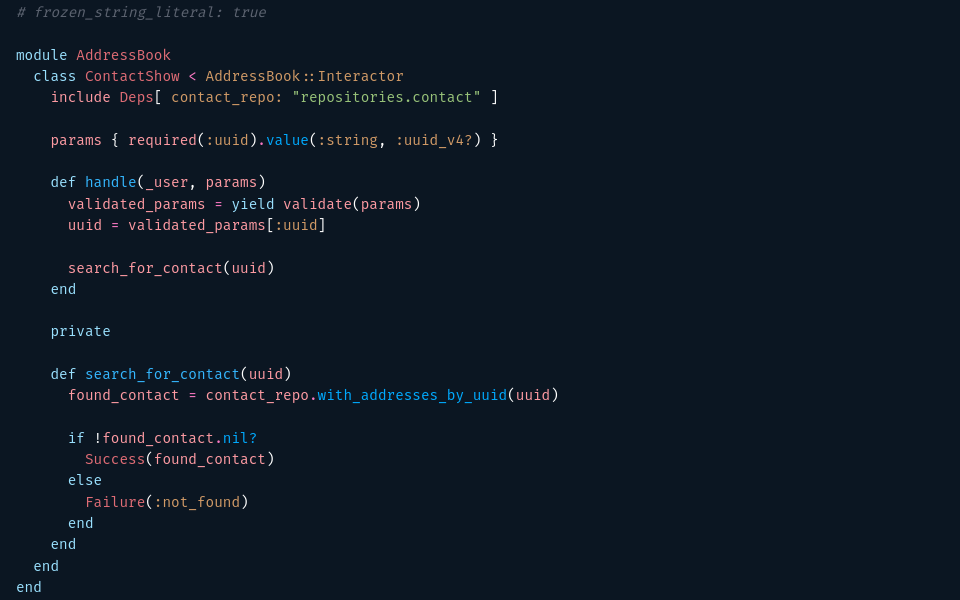
Now let’s look at the interactor for this use case. We’ll create AddressBook::Interactors::ContactShow, and move the repository dependency there along with the search logic.
# app/interactors/contact_show.rb

# frozen_string_literal: true

module AddressBook
  class ContactShow < AddressBook::Interactor
    include Deps[ contact_repo: "repositories.contact" ]

    params { required(:uuid).value(:string, :uuid_v4?) }

    def handle(_user, params)
      validated_params = yield validate(params)
      uuid = validated_params[:uuid]

      search_for_contact(uuid)
    end

    private

    def search_for_contact(uuid)
      found_contact = contact_repo.with_addresses_by_uuid(uuid)

      if !found_contact.nil?
        Success(found_contact)
      else
        Failure(:not_found)
      end
    end
  end
end
You can see that our params management has moved from the action to our interactor. Also note that the user argument is received by the handle method, but not used due to the simplicity of the example.
In the handle method, we do all of our work.
- First, we retrieve validated parameters using the
validatemethod defined in the interactor base class, usingyieldto unwrap the successful result or short-circuit the remainder of the method if the parameters are not valid. - Next, we extract the UUID search parameter from the validated parameters (this is for the clarity of the example, but could be combined into the next step).
- Finally, we call our
search_for_contactmethod with the UUID.
Note that yield is not used in the last step. This is because we don’t want to short-circuit the last operation or unwrap the successful result. Rather, we want the Result object returned by search_for_contact to be the return value of our interactor. Again, the search_for_contact private method shows the use of Success and Failure objects to capture the result of the search.
Let’s turn our attention back to our refactored action. But before we look at it, we have a little housekeeping to do. Since we want to use pattern matching in our actions to evaluate the Result objects returned from our interactor, we have to first teach our actions how to create Result objects. This is because pattern matching in Ruby relies on the case-in statement being able to create the objects being matched against. We will solve this problem by adding the requirement to our app’s Action base class.
# app/action.rb

# auto_register: false
# frozen_string_literal: true

require "hanami/action"
require "dry/monads"

module AddressBook
  class Action < Hanami::Action
    include Dry::Monads[:result]
  end
end
Now we’re ready to refactor our action. Here’s how it looks now.
# frozen_string_literal: true

module AddressBook
  module Actions
    module Contacts
      class Show < AddressBook::Action
        include Deps[ interactor: "interactors.contact_show" ]

        def handle(request, response)
          user = "anyone"
          params = request.params
          result = interactor.(user, params)

          case result
          in Success(contact)
            response.render(view, contact: contact)
          in Failure(:not_found)
            halt :not_found
          in Failure[:invalid_data, *]
            halt :unprocessable_entity
          end
        end
      end
    end
  end
end
You can see that the repository dependency has been replaced with a dependency on our new interactor. In the handle method, I wanted to make variable assignments very explicit to aid the clarity of the example, but the entire method could easily be reduced to a single expression passed directly to the case statement. The pattern matching itself requires a certain amount of verbosity, but I think it’s very clear and easy to read.
In the pattern matching block, automatic variable assignment makes the Success matching clause succinct and easy to read. While the Failure clauses do not use variable assignment, as it’s not needed in these examples. Finally, note the use of square brackets in the final Failure matching clause to match against the array contents of the Failure. Only the first element is matched against, with any remaining members of the array being ignored.
Retrospective
Now, you might point out that the example given above has more lines of code in the end than it did in the beginning, but that’s kind of beside the point. I’m interested in the idea of separating “infrastructure” from business logic, and I think our little interactor does that job quite nicely and with a lot of transparency. That’s the big win in my mind.
In closing, the title of this article is A Simple Business Object for Hanami, but ProtoInteractor can actually be used in any project, with any framework. The only dependencies, other than Zeitwerk, are Dry-Validation, Dry-Monads, and Hanami-Utils (because I didn’t feel like writing my own String.titleize method, especially since I’m already using Hanami and get Hanami-Utils for free). I’m using ProtoIneteractor right now with Hanami, but nothing in the gem requires any specific framework or context.
That means you can try out ProtoInteractor in your project right now! Please do, and be sure to let me know what you think!
Try out ProtoInteractor now by adding the following line to your gemfile.
gem "proto_interactor", git: "https://gitlab.com/dcr8898/proto_interactor"
Let me know if you think I should publish it!
Wrap up
Thank you for reading! I hope you enjoyed it!
Corrections, questions, and feedback are welcome on Mastodon.